DJI and Epson Forge AR Goggles

On 8 September 2016, Epson announced its new partnership with DJI. So, what does this mean? To be more precise, the two companies will be working to make Epson’s Moverio BT-300 smart glasses compatible with the DJI GO app which is used for the DJI Phantom, Inspire and Matrice drone series as well as the Osmo handheld gimbal and camera.

This compatibility means DJI pilots can now view FPV feed from their drones using the Moverio BT-300 — an augmented reality (AR) smart eyewear platform.

The Moverio BT-300 glasses comes with head-tracking sensors which can be used to provide drone pilots with a transparent 360-degree view via its silicon-based OLED digital display. Pilots will be able to view video footage streamed from a drone’s camera and read flight data on the OLED display. Since the display is transparent, pilots do not need to remove the glasses if they want to look at their drones directly.

Considering that many countries now have drone regulations that require pilots to fly their drones within line-of-sight (LOS), the BT-300 will allow pilots to adhere to these regulations and simultaneously be able to view their FPV feeds with the glasses on.

“The Moverio BT-300 marks an impressive advance in performance for the platform and will make flying and filming safer and help users stay in compliance with regulations. We are excited to see the incredible applications that can be built with the Moverio BT-300 and … the possibilities truly are endless.” ~Michael Perry, Director of Strategic Partnerships, DJI

The Moverio BT-300 runs Android 5.1 and is powered by a quad-core Intel Atom X5 processor. It is also 20 percent lighter than its predecessor — the BT-200, making it the world’s lightest augmented reality glasses.

DJI is expected to put the BT-300 on sale at its official website soon, just in time for the holiday season.

Awesome MJX Deals at CAFAGO

CAFAGO is currently offering awesome discounts for two of its most popular drones — the Bugs 6 and Bugs 3. The Bugs 3 is currently available for just $98.97 while the Bugs 6 for $76.99. These two MJX deals are currently one of the best offered by any online store.

I have reviewed the Bugs 6 and Bugs 3 not too long ago and they are both very competent ready-to-fly drones that come with brushless motors. The Bugs 3 makes a great all-rounder and can do a bit of both aerial photography and freestyle FPV flying. It comes supplied with a GoPro mount which means you can take some pretty decent aerial videos and photos if you have a GoPro or other similar-sized action cameras.

Costing less than $100, this is one drone that won’t beat a DJI Mavic Pro or Spark when it comes to aerial photography but what you get is plenty of value. Bear in mind that proper aerial photography drones with gimbal stabilizers cost at least four times more than the Bugs 3. The Bugs 3 normally sells for a little over $100 but now with coupon code MJX7325, you can get it at CAFAGO for just $98.97. Click here for more details.

The other MJX drone being offered here is the Bugs 6 which is yet another highly popular model from MJX. It was released more recently and is MJX’s first ready-to-fly FPV racer with brushless motors aimed at beginners. The Bugs 6 comes in a number of kits with the most basic kit featuring the drone and transmitter only (remote controller). The full kit costs twice as much as the basic one with additional items such as the FPV camera and headset/monitor.

CAFAGO is currently offering the basic MJX Bugs 6 kit at just $76.99 with coupon code MJX4619. Now that’s a pretty good deal considering that a toy drone with brushed motors such as the Syma X5UW sells for about the same price. Click here for more details on how to purchase.

If MJX is not on your shopping list, you can buy just about anything at CAFAGO with a 6% discount with coupon code QCCAFAGO. The two coupon codes for the Bugs 6 and Bugs 3 expires on October 8 while the 6% coupon code expires on October 20.

DLFPV DL-1060 (In-Depth Review)

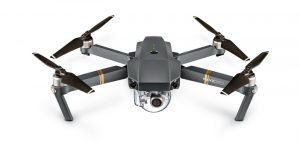
DLFPV is a new brand specializing in FPV products and its latest drone — the Swift DL-1060 micro FPV racer with brushed motors is one of the most exciting things to hit the FPV scene recently.

Why exciting? Because it costs just $100 and is a complete micro 5.8G FPV racer that comes with its own transmitter (remote controller) and FPV monitor or headset. 5.8G micro FPV racers aren’t new and they’ve been around since last year but a micro that has everything you need for 5.8G FPV flying for just $100 is still something of a rarity.

In the past, getting into 5.8G micro FPV flying meant buying a micro FPV drone and then deciding which radio you want to use for your drone. The drone may or may not come with its own FPV monitor or headset and if it didn’t, you’d have to decide which monitor or headset to buy. These decisions may not seem too hard for seasoned pilots but for beginners who are just discovering micro FPV drones, it can be a bit intimidating and confusing, especially when it comes to choosing which radio to buy since there are a number of different brands out there and receiver/transmitter compatibility can sometimes be an issue.

Product Highlights

  • Dimensions: 110 x 110 x 70mm (with camera mounted)
  • Platform: Quadcopter
  • Diagonal motor distance: 85mm
    Flight features:
  • Flight modes: Stability, Medium and High
  • 3D flips
  • Headless mode
  • Propulsion: 14300kV 720 brushed motors / 23mm 3-blade propellers
  • Weight: 47g (with battery and camera) / 35g (without battery / with camera)
  • Supplied battery: 3.7V 430mAh 1S Li Po
  • Charging time: about 30 minutes
  • Flight time: about 5 minutes
  • Control distance: about 50m to 100m
    Camera resolution: 600TVL
  • Camera FOV: 148 degrees (horizontal)
  • FPV channels: 40
  • FPV transmission power: 25mW
  • FPV transmission range: 150 – 200m

The guys at DLFPV probably realized this and came up with the DL-1060 which was designed specifically for beginners. It’s a geat kit for anyone who’s just starting out in FPV and have yet to learn the ropes. The DL-1060 comes in four different kits:

  • DL-1060 (transmitter with drone)
  • DL-1060W (transmitter, drone, camera)
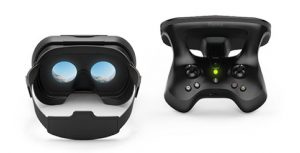
  • DL-1060WG (transmitter, drone, camera, FPV headset)
  • DL-1060WM (transmitter, drone, camera, FPV monitor)

The kit featured in this review is the DL-1060WM and was kindly sponsored by DLFPV.

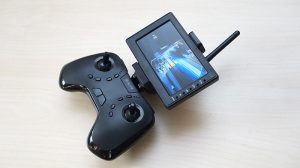
When I first got my hands on the DL-1060, I was impressed with the design and quality of its transmitter. Some toy drones in the $100 price range still come with ugly and uncomfortable transmitters but the DL-1060’s Tx looks very well designed. It may not feature rubberized coating but it feels very comfortable in the hands. For a drone that costs just $100, the DL-1060’s Tx has excellent ergonomics, comfort and looks.

With the bundled transmitter, there is nothing you need to worry about regarding compatibility or specific binding procedures for your transmitter — something you’ll need to know if you’re messing around with FrSky or Spektrum systems, for example. Just turn on the drone and transmitter and move the throttle stick up and down to bind (connect) the Tx to the drone and you’re ready to fly. It is that easy. When flying the DL-1060, I feel the Tx is very comfortable and has just the right shape and size for my hands.

Flight Performance

The DL-1060 has 3 pre-set flight modes — Stability, Medium and High. Stability mode is the slowest of the three while High unleashes the full power of the drone’s propulsion. Of the three modes, Stability seems to be the most interesting one. This mode is on when you see the green LED light on the left LED array of the transmitter.

Although the DL-1060 doesn’t actually have a barometer for altitude hold (a feature for automatically maintaining flying altitude), throttle control on it seems to mimic altitude hold on toy drones that have the feature. When the throttle is pushed down to zero, the motors do not shut off completely and continue spinning, causing a slow descend. When the throttle is maxed out, you get a gradual ascend. Earlier when testing the DL-1060, I had suspected that it doesn’t have a barometer and this was later confirmed by DLFPV themselves.

This subdued throttle control response is a great feature to have for beginners. Beginners generally have difficulty hovering their drones at a fixed altitude with manual throttle control. This why altitude hold was introduced into toy drones in the first place — to make them easier to hover. Hovering a drone with manual throttle is a skill that takes time to develop and less experienced pilots tend to over-correct or under-correct their throttle, resulting in an unstable flight which can result in crashes.

This simple throttle feature in Stability mode is brilliant and makes the DL-1060 easier and more fun to fly compared to other toy drones (even those that come with real altitude hold). This makes me wonder why such a feature that doesn’t require a barometer wasn’t introduced earlier. Toy drones with altitude hold can sometimes feel choppy or erratic when flying especially when it’s windy. This is not an issue with the DL-1060.

In Medium and High modes, you get manual throttle control and flight speeds are a lot faster. These two modes are more suited to experienced pilots. Yaw rate is also higher in Medium mode and highest in High mode. Automated 3D flips can be performed in Medium and High but not in Stability mode.

Overall, the DL-1060 is a lot of fun to fly indoors and its Stability mode makes it an excellent choice for beginner pilots. All flight features on it are pre-set and it does not come with a micro USB port that allows you to connect using a computer to configure its flight controller. Since the DL-1060 is aimed at beginners, I believe there is no need for such a feature.

Camera and FPV monitor

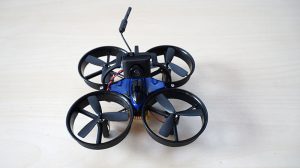
The DL-1060 features a 5.8G FPV camera with a built-in 25mW video transmitter. It sits suspended on top of the drone attached to a nylon mount that allows the camera to tilt up and down. The mount is simple yet functional and flexes quite a bit to absorb impact during hard landings or crashes. The camera can be detached form this mount without using any tools.

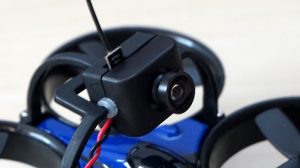
The camera features an omnidirectional antenna which works quite well. Although not as superior as cloverleaf antennas in terms of transmission performance, it is not as fragile and won’t easily get damaged during crashes compared to cloverleafs. It also features a 1/3 CMOS sensor and 40 FPV channels which can be switched by pressing the channel buttons with a pin.

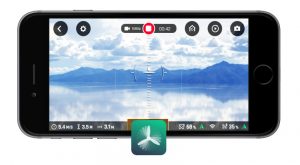
Image quality is quite good and the CMOS sensor performs reasonably well even in low light conditions such as flying indoors relying only on artificial lighting at night. Though image noise levels are high in low lighting, you can still see enough details to fly properly. The camera also features a 150 degree field of view which is just about right for FPV flying.

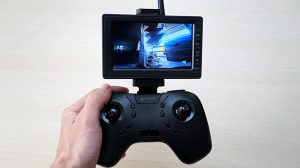
The DL-1060WM kit comes with a 4.3″ FPV monitor (480 x 272p resolution) that can be attached to the top of the transmitter using a grip mount. Display quality is quite good and the monitor comes with an omnidirectional antenna that can be removed should you need to upgrade to a better antenna for improved reception. No sunshade is provided although the monitor does have slots at the top and sides for installing one.

The monitor can receive up to 40 FPV channels and channel search is done manually. It also comes with a built-in battery and a micro USB charging port. This means you can use common micro USB chargers for it.

Conclusion

Overall, I am very impressed with the DL-1060. At a glance, it may look like any other micro FPV racer but at just $100, it gives you the full 5.8G FPV experience without burning a hole in your wallet. Considering that many other toy drones without 5.8G FPV cost about $30 to $100, the DL-1060 offers plenty of value.

With its Stability mode that makes flying and hovering easy, this is one toy drone that was clearly designed for beginners. If you’re looking to discover 5.8G FPV flying but do not wish to spend big money on some fancy FPV headset, transmitter and brushless drone then the DL-1060 is an excellent choice.

The only reason why one would consider some other toy drone over the DL-1060 would probably be looks. This is one toy drone that doesn’t have anything fancy or sophisticated when it comes to looks. However, it more than makes up for that with its excellent flight performance, well-designed transmitter and decent 5.8G FPV system.

The WLToys Q616 Is a Lot of Toy Drone for Just $45

Prices of toy drones have been tumbling steadily and buyers these days are really spoilt for choice when it comes to buying toy drones. The WLToys Q616 is one such example of a well-designed toy drone that costs just $45 shipped. A quick look at the Q616’s spec sheet reveals only mediocre features but this is one model that offers plenty of value considering that just 1 year ago, a drone like this would cost at least $100.

Product Highlights

  • 0.3MP WiFi FPV camera
  • Flight features:
  • Altitude hold
  • Auto landing / take-off
  • Headless mode
  • One key return
  • Approximately 75m control range
  • 8 to 10 minutes flight time
  • 3.7V 900mAh Li Po battery (with proprietary slot-in design)

The Q616 has all the staple features we’ve come to expect from a sub-$100 drone and this includes altitude hold and headless mode. What really impresses me about this drone is its looks. Both the drone and transmitter (remote controller) look aesthetically pleasing.

I’ve never used it before but the transmitter looks like it has decent ergonomics, looking very much like the Tx from the DLFPV DL-1060 micro FPV racer that I received recently.

It’s a pity that the Q616 comes only with a 0.3MP WiFi FPV camera and not 2MP but at this price point, 0.3MP is still pretty standard. The WLToys Q616 is available at LightInTheBox for just $45.

The New Parrot Bebop 2 Power is Parrot’s Answer to DJI’s Spark

Selfie drones have really taken off this year with the DJI Spark leading the way in the premium segment and with dozens of toy drone manufacturers following suit in the sub-$100 segment. And now Parrot becomes one of the latest brands to release a selfie drone with its new Bebop 2 Power.

Almost every detail in the new Bebop’s spec sheet takes aim at the Spark including its $600 price tag. The Bebop 2 Power also features a similar size to the Spark and comes with the Sky Controller 2 which allows for an extended control range of up to 2km.

Parrot Bebop 2 Power Highlights

  • 14MP WiFi FPV camera
  • HD 720P FPV transmission up to 2km
  • In-camera digital image stabilizer (3 axis)
    Flight features:
  • Sport and Video flight modes
  • GPS + GLONASS positioning
  • Locate My Bebop
  • Return Home
  • Geofence
  • Follow Me (Visual and GPS)
  • 360 panorama shots
  • Dronie / Selfie features: Orbit, Tornado, Parabola, Boomerang
  • Cockpitglasses 2 for immersive FPV flying (smartphone required)
  • Sky Controller 2 for extended control range (up to 2km)
  • 65km/h top speed
  • Accompanying Freeflight Pro app for controlling advanced flight features and automation
  • Up to 30 minutes flight time
  • Bebop 2 FPV backpack (Adventurer Pack only)

The Power is currently available in two different kits on Amazon — the Base FPV Bundle which features one Parrot Bebop 2 Power drone, battery, Cockpitglasses 2 and Sky Controller 2 along with standard accessories such as a charger. The base bundle costs $499. There is also the Adventurer Pack that is available for $579.99. This includes everything in the Base Bundle but with the Bebop 2 FPV backpack (worth $99.99) thrown in.

At the heart of the Power is its WiFi FPV camera which features a wide angle lens with 14MP resolution capable of shooting HD 720P videos at 30fps. The camera records stills in JPEG and also in Adobe DNG RAW for post-production image editing.

To counter camera shake and vibrations, the Power uses a 3-axis in-camera digital image stabilizer. Though Parrot’s digital stabilization technology works rather well, as seen in earlier Parrot camera drones, it is not as superior as systems that use mechanical gimbals such as the 2-axis camera gimbal on the DJI Spark. With in-camera systems, stabilization is achieved by cropping the image in real time which effectively reduces image quality depending on how bad the shake or vibration. The good thing about in-camera systems is that they are a lot more compact, lighter and use less power since no mechanical gimbal is present.

The flight features on the Bebop 2 Power cater to a wide range of users from fast-flying FPV pilots looking to do some casual FPV flying to those interested in taking good selfies and aerial imagery. With a top speed of 65km/h, the Power has just enough speed to thrill the casual sport flier.

To make FPV flying more immersive, the Power comes with the Cockpitglasses 2 which works like a VR headset. Your smartphone is installed on the glasses and act as the FPV screen so you can see what the drone’s camera is seeing.

The Power also has GPS + GLONASS positioning, making all semi-automated flight modes easy to operate. GPS is used in a number of important features such as Return Home and Locate My Bebop. The Power also has Geofencing which lets you set an airspace boundary which greatly helps in preventing flyaways. Despite all these cool features, the Bebop 2 Power is still slightly behind the Spark lacking features such as the Spark’s obstacle avoidance and Vision System. The Power is also available only in dark gray while the Spark has multiple color options for its canopy.

Despite this, Parrot does have a serious contender here to rival the DJI Spark. It has just the right price and the right set of features. Whether it will be successful really depends on the reliability of the drone, its accompanying app and firmware. If Parrot has done its homework and come up with a highly reliable product in the the Bebop 2 Power then there is reason for DJI to start worrying.

The DJI Go app which is used in conjunction with numerous DJI products such as the Spark is known to have issues with the most recent debacle involving DJI Sparks crashing or flying away.

New Prusa i3 MK3 Released

Prusa Research, the company that is synonymous with the i3 3D printer, has just released a new version of its highly popular DIY kit — the Prusa i3 MK3. At a glance, the MK3 looks very similar to its predecessor but it is what’s under the hood that sets the two apart. In fact, the two are really hard to tell apart if you look at product photos since both have the same metal frame and orange colored 3D-printed parts.

The key difference is in the host of smart features that Prusa has incorporated into the new MK3 — and this is one 3D printer that is not short of smart features that would get any 3D printing enthusiast sweating with excitement.

First up is the filament sensor which uses lasers to detect the presence of a filament. Not only that, the lasers are also capable of sensing whether the filament is moving or not which helps in detecting nozzle jams. When the filament runs out or if it stops moving, the MK3 immediately pauses and alerts the user.

There is also the Power Panic feature which lets the MK3 resume a print after a power cut. Power Panic can store the MK3’s last printing position without the need for batteries. When a power cut happens, the MK3 automatically shuts down its heated bed and hot end to conserve power, stores its print position in memory and then uses remaining power in its capacitors to park the hot end away from the print.

The MK3 features a new EINSY RAMBo motherboard which uses Trinamic2130 drivers that are capable of detecting layer shifts. The drivers also allow for faster and more silent printing. The board is also OctoPrint-ready so this takes out a lot of guesswork if you want to use OctoPrint with your MK3.

The print bed also sees some major reworking. The new magnetic MK52 heated bed features a PEI sheet specially developed by Prusa. The PEI sheet is made of flexible steel that has been powder-coated with PEI. This allows the PEI sheet to be secured onto the heated bed via magnets which are installed in the bed itself. Removing or installing the PEI sheet requires no tools and removing prints from the PEI sheet is as easy as bending it to release the prints.

There are just too many smart features in the MK3 to mention so here’s a summary of these features:

  • Filament sensor (using lasers)
  • Power Panic
  • Noctua fans with RPM sensors
  • Ambient thermistor and P.I.N.D.A 2 with thermistor
  • EINSY RAMBo motherboard
  • Trinamic2130 drivers with layer shift detection, faster and silent printing.
  • New Y axis
  • Bondtech extruder
  • Magnetic MK52 Heatbed
  • Powder coated PEI spring steel print sheet
  • OctoPrint-ready

The Prusa i3 MK3 is available as a ready-built printer for $999. It is also available in DIY kit form for $749. Both are now available for pre-order and the first batch of MK3’s are expected to ship in November. MK2 owners who want to have some of the new smart features can also purchase the MK2.5 upgrade kit for $199. The upgrade kit includes:

  • Magnetic print bed with PEI steel sheet
  • Bondtech extruder with Noctua fans
  • PINDA 2 bed leveling sensor and filament sensor

Customers who bought the MK2 within 30 days of the release of the MK3 are offered a special price of $99 for the MK2.5 upgrade kit. For more details on how to purchase the Prusa i3 MK3, click here.

TronXY Unveils Updated X3S

Barely months after the release of the X3S, TronXY has unveiled an updated version of its budget large volume 3D printer. The new version still carries the name X3S and has been updated to look very much like a CR-10.

The Z-axis now use beefier 2040 extrusions as opposed to the thinner 2020 extrusions on the earlier X3S. Both left and right Z-axis carriages now feature pulley bearings that face the side of the 2040 extrusions instead of the front and rear which was the case with the first version. Clearly, the new X3S has taken plenty of design cues from the CR-10.

Product Highlights

  • 330 x 330 x 420mm print volume
  • Pre-assembled DIY kit
  • Full assembly takes 3 steps
  • Belt tensioners for X and Y axis
  • Full metal frame with 2040 and 2020 aluminum v-slot extrusions
  • 2040 extrusions for Z axis
  • Bowden extruder
  • Reworked Z axis carriages now feature side to side pulley bearings
  • Console box with integrated filament spool holder
  • Red v-slot covers included

Even the extruder motor has been moved to the left and is now mounted just above the X-axis motor. Not only that, TronXY has redesigned the X3S’ console box to look like that of the CR-10 with an integrated filament spool holder. The frame even features red linear slot covers installed in a similar fashion to the CR-10 which features either orange or blue covers. Gone are the adjustable legs which have been replaced with rubber studs.

Similarities aside, the new X3S also features belt tensioners for the X and Y axis. Unlike the earlier X3S which is a DIY kit that takes several hours to build, the updated X3S is a pre-assembled kit and product pages indicate that it can be assembled in just three steps.

The heated bed appears to have the same size as the earlier X3S, measuring 330 x 330mm though there is no mention whether the updated X3S still features the same MK2a bed. Product pages for the earlier X3S mention a size of 300 x 300mm which is a bit misleading because that is the size of the area on the bed covered by copper tracings (the actual size of the bed being 330 x 330mm).

The earlier X3S had problems providing enough current for its heated bed. Contrary to what many believe, the MK2a bed on the X3S is not poorly made or defective. It is just not getting enough current to heat up beyond 70C (without insulation). With the supplied 12V power supply and an internal bed resistance of 2 Ohms (as measured on my sample unit), the X3S is providing only 6A of current to its bed — this value is way below the recommended 8 to 10A needed to heat a smaller 200 x 200mm MK2a up to 100C as recommended by RepRap Wiki.

With a larger 330 x 330mm MK2a, I calculate it would take around 13 to 15A of current to achieve 100C. This current draw would be impossible to achieve with the supplied 12V PSU of the X3S even if the bed resistance is 1 Ohm — something which is not possible with even smaller MK2a beds which have resistance values of anywhere between 1.2 and 1.8 Ohms.

With the new and updated X3S, it would be interesting to see if TronXY has solved the problem. Unfortunately, product pages do not describe the power supply and heated bed in detail.

The new X3S is currently available at GearBest for $426 shipped. Click here for more details. The older version is still available for $289. At over $400, the new X3S is indeed a lot more expensive than the earlier version. With such a price tag, I would expect it to come with a heated bed that works properly with a pre-installed MOSFET. Otherwise, it is just overpriced and no different from other DIY kits that need a lot of upgrades and work.

Print a House with a 3D Printer

Do you know what’s amazing about 3D printers? They can print whatever we want them to print using whatever items we could think of at which ever place we want. We know that they can print food, wood, plastic and now, from a Champaign lab, 3D printers can also print concrete!

Yes, these new 3D printers can use locally available materials like sand, gravel and other such substances to print concrete structures at a fraction of the normal price.

In fact, a 512 square-foot concrete barracks hut or also known as the B-Hut was successfully printed using the Automated Construction of Expeditionary Structures (ACES) by the Construction Engineering Research Laboratory (CERL) in Champaign, Illinois.

“ACES provides a capability to print custom designed expeditionary structures on-demand, in the field, using locally available materials. ACES will allow the Army to print buildings and other required infrastructure, such as barriers, culverts and obstacles on location.” – Dr. Michael Case, CERL ACES program manager

There are many benefits to these 3D printers. They can fit into a shipping container or in the back of a C-130 plane to be transported to the site easily. ACES also has the potential to reduce using building materials by half and reducing manpower by 62 per cent.

“The ACES team designed, built, and validated an additive, three-dimensional concrete printing technology that is a real game changer. Unlike previous efforts, ACES can use up to 3/8” aggregate in the concrete that is used. In addition, the ACES project paid particular attention to methods of reinforcing printed concrete, both horizontally and vertically.” – Case

Because this project shows much promise, CERL has also teamed up with NASA to make ACES technology more mobile. In fact, NASA designed and built the dry goods delivery batching system that was used to print the B-Hut. Michael Fiske, a team leader of NASA/Marshall Space Flight Center, said NASA started exploring this possibility back in 2004.

However, the project was cancelled in 2007. In 2013, the Army Corps contacted NASA again and proposed a joint project to continue development of the mobile hardware needed to shape the materials. Now, NASA has high hopes for using this technology in outer space construction in the future.

Besides NASA, there is also a Cooperative Research and Development Agreement with Caterpillar Inc. to explore ACES technology for disaster relief operations. Eric A. Reiners, Caterpillar’s program manager for automation and site technologies, said the fit was natural.

“We already partner with the U.S. military on projects around the world and in rescue areas, and if one day there are building projects on Mars, we want to be there as well.” – Eric Reiners

Yes! My wish is finally coming true. Besides helping to build houses cheaply and quickly in disaster-prone areas, I can also 3D print my own mansion. I can only hope it can be done within the next five years. Better yet, I hope it can be printed while I’m happily staying in outer space.

Exciting DJI and JJRC Coupons at TOMTOP

TOMTOP is currently offering a few good coupon deals for some highly popular DJI and JJRC products. The list includes a few DJI Mavic Pro kits, DJI Phantom 3, JJRC H37 and JJRC H47. This is a wide price range, I would say, covering the sub-$100 toy drone segment all the way up to the class-leading Mavic Pro.

The following is a summary of the coupons on offer:

  1. JJRC H37 Baby Elfie with two extra batteries (10$ off / coupon code TTH3710)
  2. JJRC H47 with two extra batteries ($45.99 during flash sales)
  3. DJI Mavic Pro 13-in-1 combo ($50 off / coupon code TT0087)
  4. DJI Mavic Pro Fly More Combo with hard shell backpack and shoulder bag ($50 off / coupon code TT0081)
  5. DJI Mavic Pro Fly More Combo with faux carbon fiber hardshell backpack and shoulder bag ($50 off / coupon code TT0083)
  6. DJI Phantom 3 SE (special discount during flash sales)
  7. DJI Phantom 3 SE with hard shell backpack ($70 off / coupon code TT0104)
  8. DJI Phantom 3 SE with two extra OEM batteries ($60 off / coupon code TT0103)
  9. DJI Phantom 3 SE with two extra OEM batteries and hard shell backpack ($50 off / coupon code TT0105)

The most advanced drone in the list above is obviously the DJI Mavic Pro and TOMTOP is offering 3 combos with each combo given a $50 discount if you use the specified coupon codes. The two most expensive combos for the Mavic Pro cost $1270 after discount and each offer a backpack and shoulder bag along with the standard Fly More Combo accessories. The first combo offers a polycarbonate backpack while the second one offers backpack with faux carbon fiber finishing. All other accessories in these two combos are the same.

If you’re not willing to splash some good money on DJI’s finest folding drone, there is still the Phantom 3 Standard Edition which is still a good aerial photography drone by today’s standards. As the saying goes — old is gold.

TOMTOP is offering up to 3 Phantom 3 SE kits with discounts from $50 to $70. Two of the kits in the list above come with two extra OEM batteries. If you’re not sure what OEM (original equipment manufacturer) means, it is another way of describing products that are not original but rather products that are made to match the original product specifications. For less than $700, you can get a Phantom 3 SE with three batteries. This is not bad a deal for a drone that still takes decent aerial photos and videos.

If you’re not keen on spending much, the two JJRC drones — the H37 and H47 are worth checking out. The H37 Baby Elfie is the mini version of the H37 Elfie and costs less than $50 and comes with two extra batteries while the H47 (pictured above) is a DJI Spark look-alike that costs a bit more. Both drones are capable of taking 2MP stills and HD 720P videos — not exactly professional specs but good enough for social media.

PowerUp Dart: the Paper Airplane Stunt Monster

After two successful Kickstarter campaigns — PowerUp 3.0 and PowerUp FPV — PowerUp Toys is now back for a third campaign. And from the looks of the backers’ pledge, PowerUp Dart may be the third feather in their cap. At press time, the amount has exceeded the $25K goal at $808K with 16 more days to go.

Also, if you pledge via Kickstarter, you are eligible for special bundle rewards and special edition add-ons such as the airplane desk stand and the accessories kit with landing gear and special paper template offered to Kickstarter backers only. Head there now to pledge from as low as $29 or read on to see what it is all about.

For the uninitiated, the PowerUp products are basically RC paper airplanes. In 2014, PowerUp 3.0 was launched on Kickstarter and successfully garnered over $1.2mil pledge with over 21K backers. In 2015, PowerUp FPV was launched on Kickstarter, soaring paper airplanes to greater heights with First Person View (FPV) flying. And now, in 2017, PowerUp Dart will loop, spin and roll into your living room just in time for Christmas. How the PowerUp Dart came about was explained in the entertaining video above.

So, how is PowerUp Dart different? In a nutshell, it performs aerobatic stunts: barrel roll, flip, loop, Lazy 8, Wingover, spin, Hammerhead, etc.

Flying the DART is as simple as folding your jet to whichever style you want. Some of the styles include F-18 which is great for speedy turns, the Sully for best cruising, the Silver Bullet best for crashes and many more. After folding your desired jet, attach the DART module and connect the airplane to the smartphone via Bluetooth. When it is in the air, you can do aerobatic stunts with flicks of the wrist.

The DART is made of durable material — carbon fiber rods, nylon reinforced with glass fiber and Polypropylene plastics and a rubber bumper — able to withstand some crashes. Care should be taken when flying it though as it is not invincible. Smooth surface is preferable for longer lifespan.

Another fun part we learnt is that you can fly the Dart with friends. Yes, race it, zoom it or perform an air show. You can fly as many DARTs as you like because the Bluetooth signal does not interfere with each other.

I, for one, am looking forward to a Harry Potter reenactment of paper airplanes zipping around delivering messages in the office. The office will never be the same again.